Technology News
-
11 top productivity tips for Microsoft Edge
We live and work in browsers. It’s where we spend most of our time — and it’s where we waste most of our time as well. Web browsing is slow, inefficient, and full of time-sapping annoyances.
But it needn’t be that way. You can turn your browser into a lean, mean productivity machine. To do it, just follow these eight tips for Microsoft Edge (the Chromium version, not the legacy one) in Windows 10 or 11. You’ll learn how to switch between home and work profiles; put idle tabs to sleep to speed up your PC and increase battery life; use Edge’s Collection capabilities, perhaps the best productivity-enhancing browser feature of all time; and more.
(Note that these tips are written for Edge in version 23H2 of Windows 11 and version 22H2 of Windows 10; things may be slightly different if you use a different Windows version.)
So let’s get started — time’s a-wasting, and so is your productivity.
1. Switch between work and personal profiles
As work-from-home and remote work models become more common, many people use the same device for work and personal use. When it comes to using a web browser, that can quickly become problematic.
Mixing work and personal favorites makes it far more difficult to quickly get to important work websites or personal websites. When you’re working, you don’t want to wade through hundreds of links to family photos, vacation destinations, and YouTube videos of cats befriending parrots when you’re just looking for the OSHA website about mine safety regulations. And when you’re off working hours and want to watch a video of a Persian cat nuzzling a cockatiel, a website detailing the GDPs of every country in Europe and Asia is not your primary destination.
Different profiles let you completely segregate your browser use. That doesn’t just mean different favorites. It also means different Collections, different extensions, different passwords, and more.
Each Edge profile is tied to a different Microsoft account. So to use different profiles, you’ll need to create different Microsoft accounts. To create a new Microsoft account in Windows 10 or 11:
- Go to https://account.microsoft.com. If you’re signed in to your account, click your profile icon or initials in the upper-right corner and select Sign out. Close Edge, restart it, and go back to https://account.microsoft.com/.
- Now click the Sign in button in the middle of the page. On the screen that appears, select the Create one! link, then follow the prompts to create a new account.
You’ve now got two different Microsoft accounts you can use for Edge. When you log into one of those accounts in Windows, that will be the default account that Edge will use when you browse the web.
To switch between the two accounts, you’ll need to add that second account to Edge. To do it:
- Click the three-dot icon at the top right of Edge, then select Settings > Profiles and click Add Profile at the top right of the screen.
- On the screen that appears, click Add. You’ll be sent to a web page in a new instance of Edge. Click “Add new account” and select “Sign in to sync data.”
- On the screen that appears, sign in and confirm that you want to proceed.
Once you’ve done that, you don’t have to log out of your current account and then log into the second account to use it in Edge. Instead, when you want to use the second account, click the three-dot icon at the top right of the Edge window and select Settings > Profiles. Your current profile appears at the top of the screen. To switch to your other profile, find it in the “More profiles” section at the bottom and click the Switch button next to it.
You’ll now be sent straight to that profile. When you do that, Edge will open in a new window. So you’ll have both your profiles running simultaneously, each with its own tabs, in two separate windows. (Note that you can set up multiple additional profiles, not just one additional one.)
To minimize distractions, set up work and personal profiles in Edge.
IDG
You can also tell Edge which profile to use when you visit certain websites. To do it, in Edge select Settings > Profiles > Profile preferences, and in the in the “Automatic profile switching” section, move the Account based profile switching slider to on. From now on, whenever you visit a new website, a screen will pop up asking which account you want to use to open it. The next time you visit the site, Microsoft will remember which profile you used to visit it previously and will automatically open it in that profile.
It’s worth exploring several other settings here that allow you to customize when to use which profile. For instance, you can tell Edge to automatically open pages that are part of your company’s intranet in your Work profile.
Should you decide you want to remove a profile, in Edge go to Settings > Profiles. Switch to the profile you want to remove. Click the three-dot icon next to the “Sign Out” button and select Remove. You can always add it again later by coming back to this page and clicking the Add Profilebutton at the top of the screen.
2. Use Collections to turbocharge productivity
If you use only one tip in this article, this should be it: Use Edge’s Collections feature for a big productivity boost. It’s probably the best browser productivity booster you’ll ever find.
Collections let you gather web pages, images, and portions of web pages into a sidebar and organize them by categories. You can also add notes to each of your collections. You can create different collections for each of your projects and store web-based research there. For example, you can set up collections for your budgets, for marketing research, or for just about anything to do with your work.
To use it, click the Collections icon, a + sign inside two squares with rounded corners, in the toolbar at the top right of the screen. The Collections pane opens on the right as a sidebar.
The first time you use Collections, it will automatically start four collections: Wishlist, Reading List, Video Playlist, and Cookbook. You can use any of those collections or select Create new collection at the top of the pane and type in a name. To add the web page you’re on to a collection, move your mouse pointer over the collection and click the Add current page icon (a plus sign) that appears.
You can also add images and selected text or sections of web pages by dragging them to your collection. To add a note, go to a collection, click the three-dot icon that appears when you hover over the item you want to add a note to, then click Add note to item or Add note after item. You can also save the URL of an image on the web to the note.
The Collections feature is Edge’s best productivity booster.
IDG
You can also add web pages to a collection without opening the Collections pane. Right-click on a neutral area of the page and in the pop-up menu that appears, select Add page to Collections and choose the collection you want to add it to or start a new one. You can add images and selected text to a collection the same way.
You can also easily delete collections so that you don’t get overwhelmed by your research. It’s ideal not just for long-term research, but for short-term research for only a day or two, which you’ll then delete.
3. Get to your most-used sites quickly
Bookmarking and organizing favorites is a great way to manage a large collection of websites, but it’s not that useful if you simply want to get to a frequently used site quickly. Edge has some tricks up its sleeve if you want to get your most-used sites pronto.
Add a site to the new tab page
When you open a new tab in Edge, a page appears that shows you news and other items you might be interested in. It’s easy to pin a site to this page so it’s accessible whenever you open a new tab.
Look toward the top of the page, just underneath the search box. If you don’t see icons for pinned pages (such as for Yahoo, Amazon, your inbox, and so on), click the Quick Links down arrow underneath the search box on the right. (If you don’t see the down arrow, click the gear icon at the far right, and in the Quick Links area of the panel that appears, click Off and change it to 1 row.)
A row of site icons appears, along with a + icon. Click the + icon and type or paste in the name and URL of the site you want to pin, then click Add. The site will now appear along with the other pinned pages.
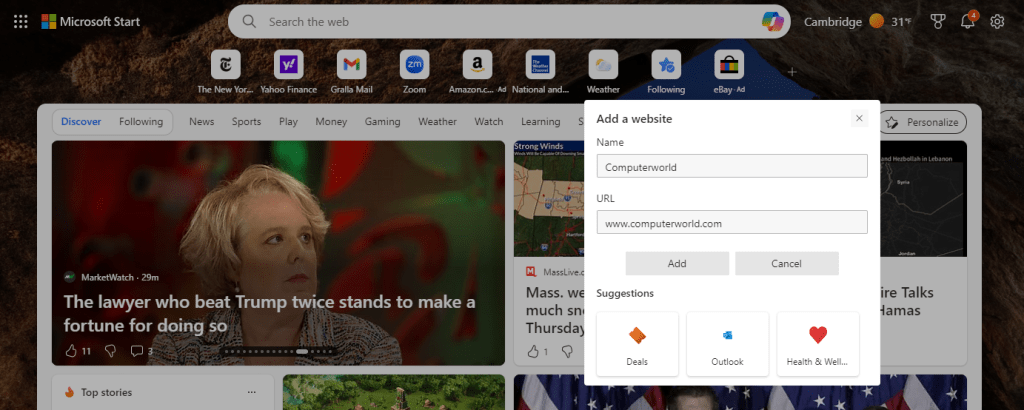
Pinning a site keeps it handy on the new tab page.
IDG
You can rename or remove any site pinned to the new tab page by clicking the three-dot icon next to the site icon and selecting Rename or Remove from the menu that appears.
Pin tabs to the top of Edge
For even faster access to frequently used sites, you can pin them as browser tabs so they appear at the far left of all your other tabs in Edge. When you’re on the site you want to pin as a tab in Edge, right-click its tab and select Pin tab from the menu that appears. The pinned tab will now appear to the left of all your open tabs.
The icon for the pinned tab looks smaller than all of your other tabs, and it will persist even after you shut down and restart Edge. If you have multiple pinned tabs, all of them will appear to the left of any non-pinned tabs.
Pin sites you often visit to the taskbar
For Windows users, the fastest way to access a frequently used site is to pin it to the Windows taskbar. That means it’s always visible (even when Edge isn’t running), and you can launch it with a single click.
When you’re on the site you want to pin, select the three-dot icon at the top right of the browser window and select More tools > Pin to taskbar. A small screen appears with a text box in it with the name of the site. Use the name provided or type a new name into the text box and click Pin.
4. Use the Edge sidebar
Edge has a narrow sidebar to the far right of the screen that you may not know about because it’s typically hidden and can be confusing to use. Some people have no use for it and keep it hidden, but others find it useful. If you haven’t tried it yet, you should give it a try.
If it’s hidden, you can reveal it by clicking the Copilot icon (Copilot is Microsoft’s generative AI chatbot) at the top right of the Edge app. When you do that, both the Edge sidebar and the Copilot pane appear. We’ll cover Copilot later in this article, so for now you’ll learn how to use the sidebar without Copilot.
To get rid of Copilot and keep the sidebar revealed, first click the “Always show sidebar” icon at the bottom right of the sidebar — it’s just above the Settings icon. Now click the X at the top of the Copilot pane. The pane will vanish, but the sidebar, a strip of icons running down the right edge of the app window, stays there.
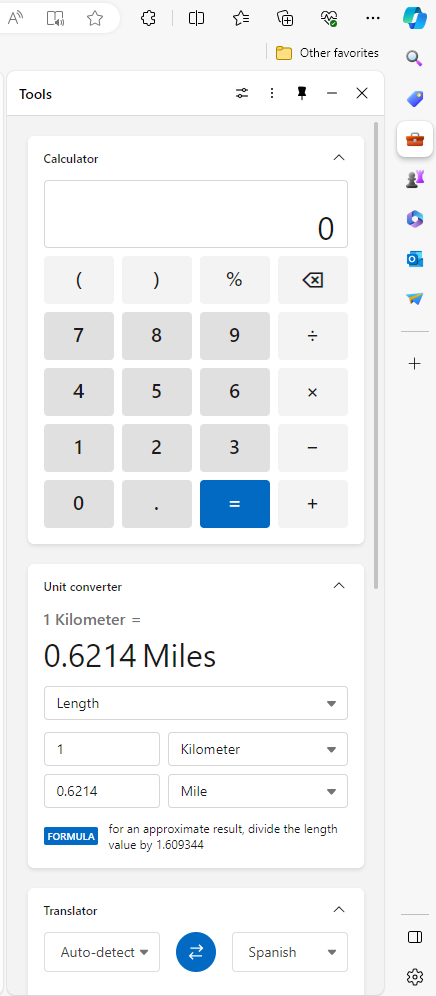
The Edge sidebar offers quick access to a variety of useful tools, including a calculator, unit converter and translator, shown here.
IDG
Click an icon and a pane opens up for the corresponding app. For example, click the Tools icon (it looks like a small toolbox) and you’ll get variety of useful tools, including a calculator, unit converter, translator, dictionary and more. Click the icon again and the pane vanishes.
There are also icons for opening Outlook, playing games, and more. (Check out the next tip for information about the Microsoft 365 sidebar pane.)
You can add more items to the sidebar by clicking the + icon below the main set of icons. A Customize pane appears where you can browse or search for apps such as Dropbox, Slack, Trello, and many others. When you have a new app open in the sidebar pane, its icon will appear just above the + icon. To keep the app’s icon in the sidebar, right-click it and select Pin to Sidebar.
If you don’t want the sidebar displayed, click the icon just above the Settings icon, and you’ll auto-hide the sidebar.
5. Use Edge as command central for Microsoft 365
Edge can be used as a kind of command central for working with the Microsoft 365 office suite, whether you’ve got a personal or a business version. Go to the Edge sidebar, as described in the previous tip, and click the six-sided multicolored icon. The Microsoft 365 pane appears.

Microsoft 365 apps are easily accessible from inside Edge.
IDG
The pane has icons for all of your Microsoft 365 applications, including Word, Excel, Teams, OneDrive, OneNote, and more. Click any icon to open the web version of that app in the main Edge window. It also shows files you’ve recently opened. Click any to open it in the main Edge window. You can filter the list of files by individual application, if you’d like. To see only Word files, for example, click the Word icon underneath the “Recent” heading.
Note that the files you see in the Microsoft 365 pane depend on which profile you’re logged into in Edge. If you’re logged in with your work profile, you’ll see the Microsoft 365 files you’ve been working on in your business version of M365. If you want to see your personal files, you’ll need to switch to your personal profile, as described in Tip 1.
6. Enlist a Copilot as you browse
As I mentioned earlier, you can also use Copilot, Microsoft’s genAI chatbot, from within Edge. Click the Copilot icon at the top right of Edge, and the Copilot pane appears. There’s a tremendous amount you can do with Copilot, and all of its uses are beyond the scope of this article. To learn more about what it can do and how to use it, see our story “7 ways to use Microsoft Copilot right.”
However, here’s one use designed specifically for web browsing: giving you information about the current web page you’re viewing. Copilot shows you information such as its rating from users, a bar chart representing total visitors to the site, analysis of where the visitors come from, and so on. To get to it, click the Insights tab at the top of the pane.
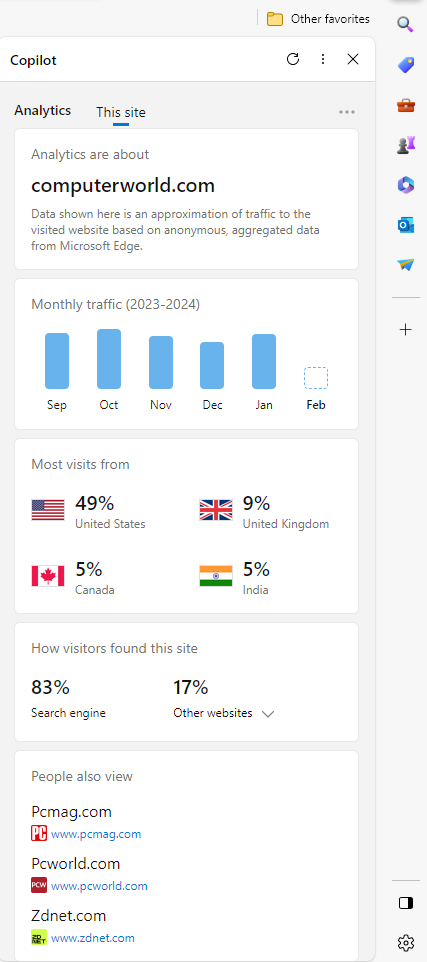
Use Copilot to get info about a website.
IDG
You can also get a summary of the web page you’re viewing (such as a news article or legal brief) by selecting the Generate page summary button in the middle of the Copilot pane. For details, see “7 ways to use Microsoft Copilot right.”
7. Put tabs to sleep to conserve system resources and boost battery life
Like most people, you likely keep multiple tabs open in Edge. That way, you can easily switch among the sites, web apps, and information important to you. It’s a great time-saver.
But it can also be a big memory and processor hog, which can slow down both your browsing and your other computing tasks. It needn’t be that way, though. You can put inactive tabs to “sleep” until you need them, freeing up resources, which will make your PC speedier and make its battery last longer, even when you have multiple tabs open. Microsoft claims that putting inactive tabs to sleep reduces memory use by an average of 32% and CPU use by an average of 37%.
Here’s how to do it:
- In Edge, click the three-dot icon on the upper right of the screen and select Settings > System and Performance.
- In the “Optimize Performance” section, move the slider to On next to Save resources with sleeping tabs.
- To change the length of time it takes to put an inactive tab to sleep, next to “Put inactive tabs to sleep after the specified amount of time,” click the drop-down arrow and select a time. Your choice is anywhere from 30 seconds to 12 hours.
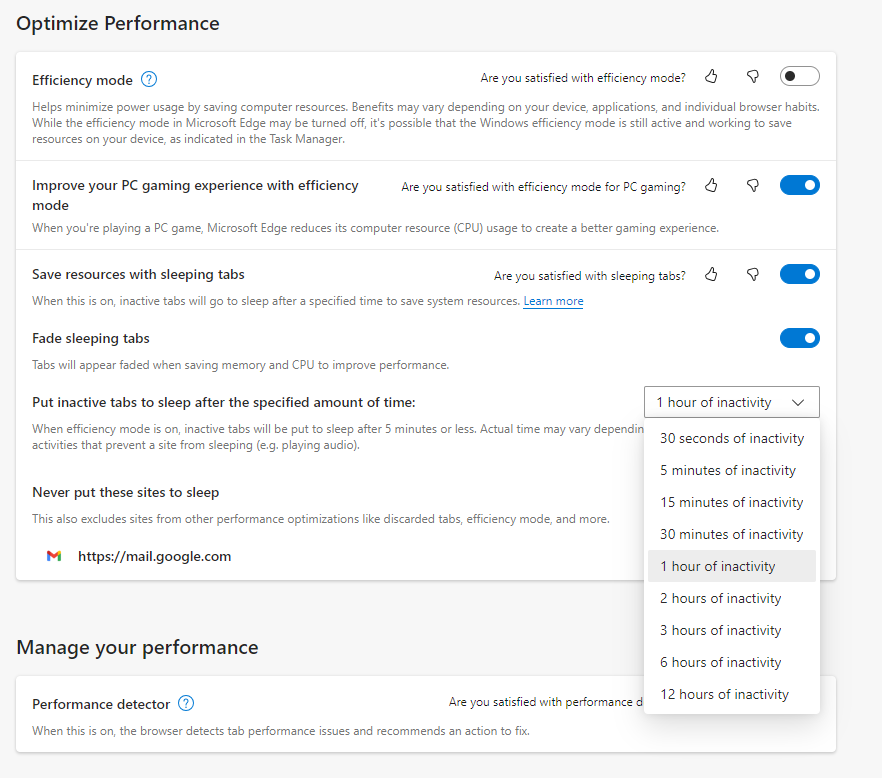
Putting tabs to sleep can significantly reduce CPU and memory use.
IDG
To reawaken any tab that’s been put to sleep, simply click on it, and it will resume normal activity.
There’s a chance that some sites might not work properly after they’ve been put to sleep. If that happens to you, you can tell Edge never to put that site to sleep again. To do it, in the “Never put these sites to sleep” area, click the Add button and paste in the URL of any site you don’t want to sleep.
8. Reduce power use with efficiency mode
Browsers can be power hogs, especially if you have multiple tabs open and are playing videos and music in them. That can be a particular problem if you’re using a laptop that isn’t plugged into a power source.
In Edge, efficiency mode reduces the amount of system resources the browser uses, which extends your PC’s battery life. If you enable efficiency mode, it becomes active when your laptop is unplugged. Microsoft claims efficiency mode can give you on average an extra 25 minutes of battery life. To use it:
- In Edge, click the three-dot icon on the upper right of the screen and select Settings > System and Performance.
- In the “Optimize Performance” section, move the slider to On next to “Efficiency mode.”
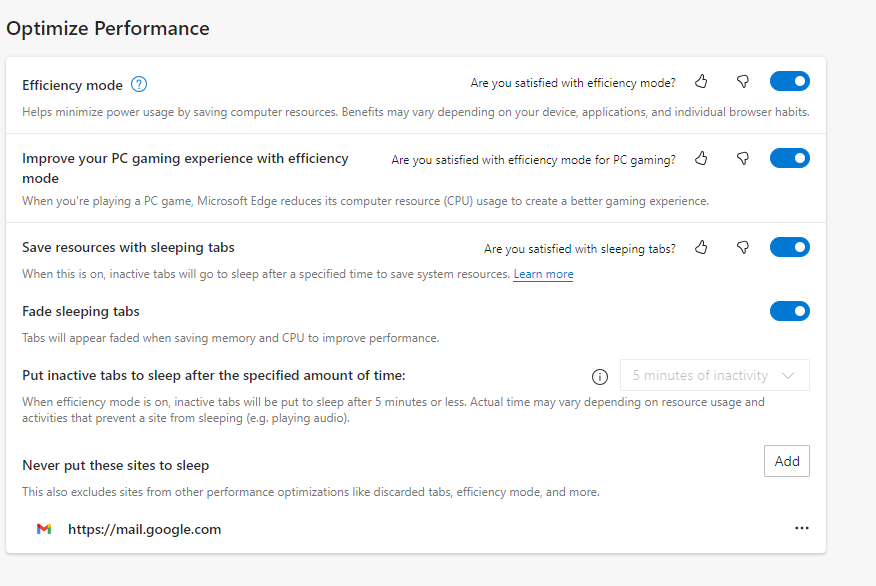
You can get an extra 25 minutes of battery life with efficiency mode, Microsoft claims.
IDG
Note that if you’re using a desktop PC or your laptop is plugged in, there’s no need to use efficiency mode.
9. View and mark up PDFs
With Edge, there’s no need to launch a separate piece of software when you come across a PDF online or when you want to read and mark up one on your PC; its built-in PDF app is quite good. With it you can draw on and highlight sections of the PDF and erase the marks you made as well. So save yourself time and use Edge rather than third-party software.
You don’t need to do anything to read a PDF online. Simply click it, and by default it will launch in Edge’s reader. You’ll find the markup tools, including for drawing, highlighting, and erasing, in a toolbar towards the top of the screen. To open a PDF from your hard disk, when you’re in Edge, press Ctrl-O, then navigate to the PDF you want to open and click it.
Edge has a surprisingly useful PDF viewer with markup tools.
IDG
If you prefer to use your own PDF reader, even for PDFs found online, you might be annoyed that every time you click a PDF, it opens in Edge’s PDF reader. You can change that, though, by changing your default PDF reader.
In Windows Settings, select Apps > Default Apps and in the search box at the top of the screen just below “Set a default for a file type or link type,” type in .pdf. After you do that, the listing “Microsoft Edge Microsoft Edge PDF document” appears. Click it, and a screen appears showing you all the applications on your PC that can read PDFs. Select the one you want to use instead of Edge.
10. Use Edge’s one-click form filler
How many hours a week do you spend mindlessly filling out web forms — your office or home address, shipping address, email address, phone number, and credit card information? Wouldn’t it be nice to get that time back?
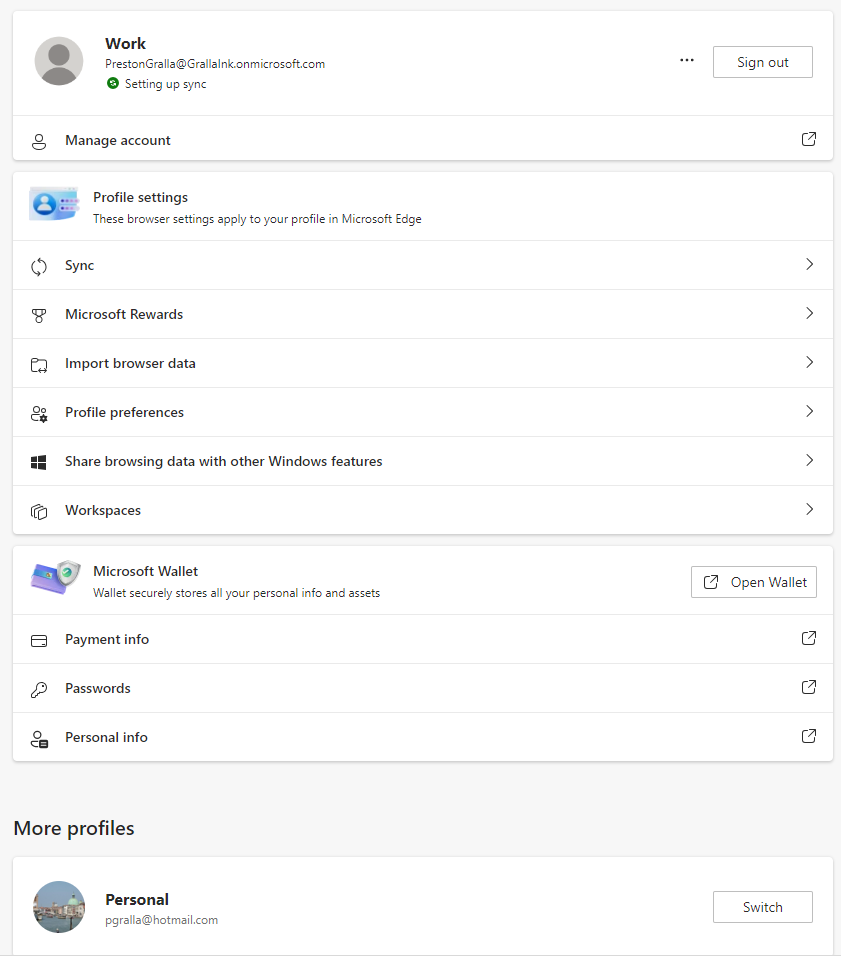
With Microsoft Wallet, built into Edge, you can do that. To use it, in Edge go to Settings > Profiles. In the Microsoft Wallet section, click Open Wallet and then click Home. You’ll see sections for adding a variety of information, such as for credit cards and other payment information, personal information, memberships, and so on. Click any item and type in the information you want to add.
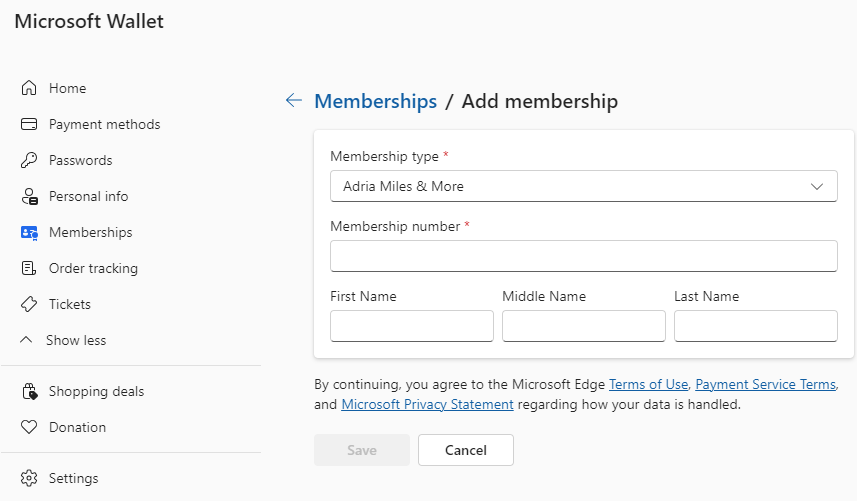
Microsoft Wallet saves information that can be used to fill out forms online.
IDG
From now on, whenever you visit a web form, just click in a text box and your information will appear in a popup. Select it and the form will fill in. You can go back to Microsoft Wallet to change any information you want.
11. Save time with keyboard shortcuts
There’s a good chance you use keyboard shortcuts for some of your office applications, like Word and Excel — and you likely use some for Windows itself.
But when it comes to browsers, many people forgo the keyboard except when absolutely necessary. That’s too bad, because keyboard shortcuts are a big timesaver. So to improve your productivity, check out these keyboard shortcuts for Edge in Windows. (Mac users can generally substitute the Cmd key for Ctrl and the Opt key for Alt.)
For even more shortcuts, see Microsoft’s complete list of keyboard shortcuts for Edge.
Useful keyboard shortcuts in Microsoft Edge
Key combination Task Ctrl-Shift-B Show or hide the favorites bar Ctrl-D Add the current site to favorites Alt-D or Ctrl-L Select the URL in the Address bar Ctrl-E or Ctrl-K Open a search in the Address bar Ctrl-F Find on the current page Ctrl-R Reload the current page Ctrl-H Open your History Ctrl-M Mute or unmute volume on the current tab Ctrl-N Open a new window Ctrl-Shift-N Open a new InPrivate window Alt-F4 or Ctrl-Shift-W Close the current window Ctrl-T Open a new tab and switch to it Ctrl-W Close the current tab Ctrl-Tab Switch to the next tab Ctrl-Shift-Tab Switch to the previous tab Ctrl-+ (plus symbol) Zoom in Ctrl– (hyphen) Zoom out Ctrl-P Print the current page This article was originally published in March 2021 and updated in April 2024.
Browsers, Microsoft Edge, Productivity Software -
The best Android app drawer enhancement you’ll ever make
When people ask me why I prefer Android over that (cough, cough) othermobile platform, the answer is a little complicated.
Sure, I like the diversity and different options Android affords me in terms of hardware — both with the more mundane, standard sorts of choices and the cutting-edge, adventurous form possibilities. And yes, as someone who very much lives and works within Google’s ecosystem, I enjoy the tighter integration of those services and the better all-around experience I have with them on Android.
I’ve generally never been a fan of Apple’s design style, either, and I find lots of things about the iOS interface to be clunky and awkward.
More than anything, though, these and other similar factors point to the same underlying principle — and what I think really gets at why I’ve been enamored with Android as both a writer and a user for some 16 years now: I appreciate the ability to make my phone work the way I want and the way that makes sense for my own personal style of working. From the hardware to the software and the rich app ecosystem around it, that’s something Android has always embraced and Apple has always resisted.
For me, the most important practicalpiece of that puzzle is having the ability to change defaults, install advanced efficiency apps, and customize practically every facet of my phone’s interface to make it as personalized and effective as possible for me — and, again, for myspecific style of getting stuff done. And there’s no place where that advantage is more apparent than in my phone’s home screen and the associated elements that control how I get around my device each and every day.
[Psst: Love time-savers as much as I do? MyAndroid Shortcut Supercourse will teach you tons of efficiency-enhancing secrets for your phone.Sign up now for free!]
I’m always thinking about ways I can optimize and improve my smartphone setup even further — because Android grants me endless opportunities to do so, and the platform’s community of creative developers embraces that ability and constantly comes out with clever new concepts.
And recently, dear reader, I had a revelation. It’s completely changed the way I use and get around my phone and eliminated tons of inefficiencies. And I’ve got a sneaking suspicion it might just do the same for you.
My Android app drawer epiphany
So first things first: You know about Android launchers, right?
Android launchers are a special category of apps on Android that let you replace your entire home screen environment with a totally different interface. It might be simpler, it might be more customizable, or it might just be a completely different and maybe even unusual kind of concept. There are all sorts of interesting options out there, and the power to choose and find a setup that makes sense for youis entirely in yourhands.
For years now, I’ve been partial to a thoughtful and unconventional Android launcher called Niagara Launcher. It’s all about ergonomic efficiency, and I’ve found its model for helping you find what you need quickly and without distractions to be incredibly effective for the way I like to work.
A key part of that comes down to Niagara’s simple vertical lists for opening up apps. Your favorite apps are always in a single column at the left side of your home screen — a spot that’s extremely ergonomic for me, since I tend to hold my phone in my left hand and thus can access all of that easily even during single-handed use — and you then just swipe your finger up or down on either side of your screen to scroll through allof your installed apps whenever you need to find anything else.
My revelation is actually two-fold, all related to that Niagara app access concept. The first part is a totally new take on my home screen involving a different launcher where I’ve recreated that same core Niagara setup and injected a bunch of otheradvanced efficiency-enhancers into the equation — most of which are hidden out of sight, to maintain a minimal and distraction-free vibe, and accessible via a series of carefully conceived on-screen gestures.
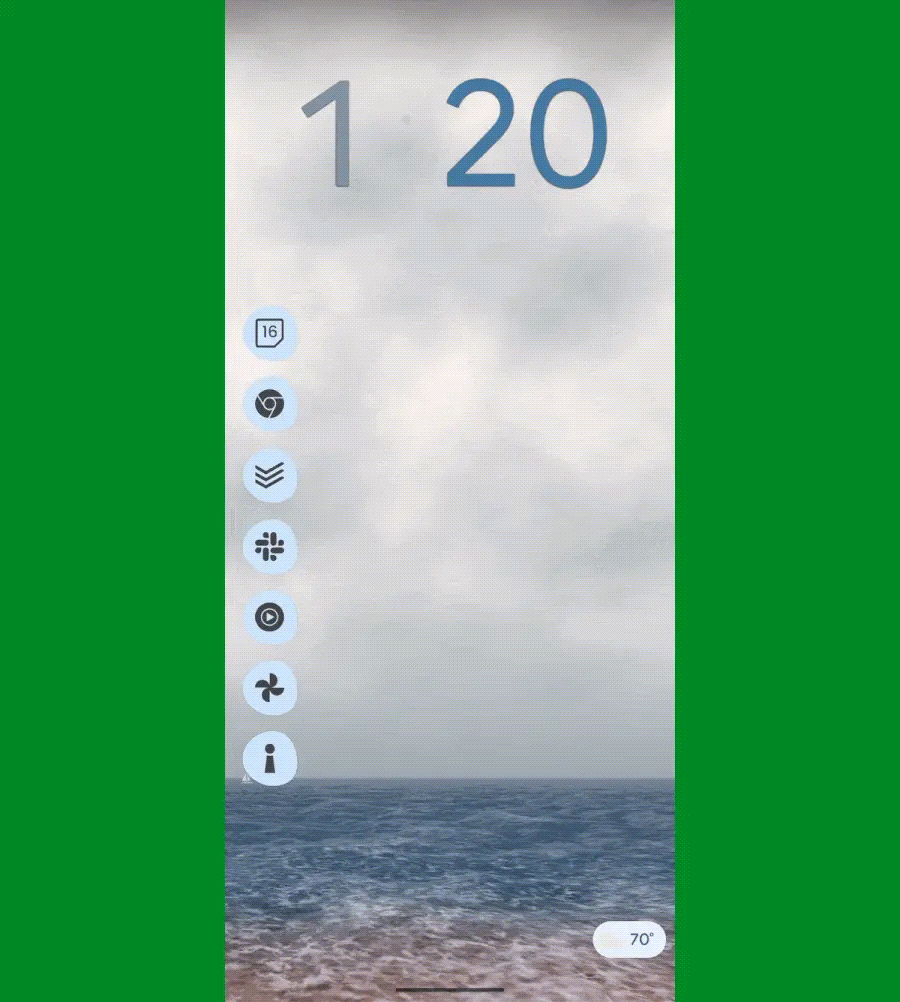
The author’s highly optimized custom Android home screen, complete with a lovely ocean view. JR Raphael, IDG
It’s quite the zesty stew of creative customization, every last detail of which I’ve shared in my Intelligence Insider Community for my fellow uber-nerds to enjoy and optionally even implement on their own (whether entirely or in selected bits and pieces) — including all of the uncommon touches and out-of-sight efficiency-optimizers I’ve worked weeks to refine and perfect.
Here, though, I want to focus on the secondpart of that revelation, and that’s all about the app drawer, specifically, and how I’m now finding and opening apps without the time-wasting traipsing that typically accompanies that.
My appreciation of the Niagara scrolling-letter-list model, y’see, led me to have the thought: “Hmm — what if I could recreate this sameconcept and take it up a notch by making it available not just on my home screen but from anywhere on my phone?”
After all, the most common action most of us take throughout the day is heading back to our home screen to open something. So what if I could cut out that middle-man step entirely and simply swipe along the side of my screen from anywhere to find and open what I want next — whether I’m in my email, my browser, my messages, whatever — without having to first head back to my home screen time and time again?
Being that this is Android and we’re granted the power to make our phones work the way we want them to work, that’s not only possible but also quite easy to accomplish. And — oh, yes — I’ve found the perfect way to make it happen.
The Android app drawer, unshackled
If you’ve been following my Android-scented ramblings for long, you’ve probably heard me rave about the sheer awesomeness of an app called Panels before.
Panels is the kind of app that could only exist on Android. As its name suggests, it lets you create custom panels that pop up when you perform specific gestures along the edges of your phone’s display — like swiping up or down in that area.
I’ve traditionally used Panels to provide easily accessible pop-ups for accessing Android widgets from anywhere. One swipe in a certain preset place, and boom: I can glance at the latest emails in my inbox or access my two-factor authentication codes no matter what else I’m in the midst of doing and without having to waste time going back to my home screen and then opening the associated app from there.
But Panels has another ability beyond those custom widget panels, and that’s giving you an on-demand app drawer you can summon from anywhere on your device.
It works a lot like my trusty old Niagara app list, too, with a simple swiping up and down to move through the list and find the exact app you need at any given moment.
But with Panels, critically, you don’t have to be on your home screen to access that interface. You can set up the app to show you the list as an overlay and effectively give you super-efficient access to your entire Android app drawer universally — with a simple side-of-screen swiping gesture that works on your home screen as well as within any other app or process.
Just one swipe up or down the side of your screen, aaaaand poof: There’s your entire Android app drawer — available in a neatly organized, efficiency-optimized list. You can swipe or tap to reach the letter you want or lean on the favorites to find apps you open often. And, most significantly, again: You can get to all of that from anywhere, without having to first fumble your way back to your home screen and waste countless seconds throughout the day. It essentially extends that part of your home screen throughout your entire device, which is a pretty awesome power to have.
The Android app drawer, optimized for efficiency and available from anywhere. JR Raphael, IDG
Setting it up is surprisingly simple — and something you’ll only have to do one time:
- First, download and install Panels from the Play Store.
- Open the app and follow the prompts to allow it to send notifications and to display over other apps (two innocuous permissions that are legitimately required for the app to do what it needs to do).
- Now, on the app’s main setup screen, tap “View.”
- Tap the circular blue pencil icon in the lower-right corner of the screen that comes up next and tap “Delete / Reposition / Rename.”
- Tap the trash can icon next to both “Apps and shortcuts” and “Widgets” — two sample panels that are present in the app by default but that you won’t need for these purposes.
- That should leave you with only one remaining panel, called “App list.”
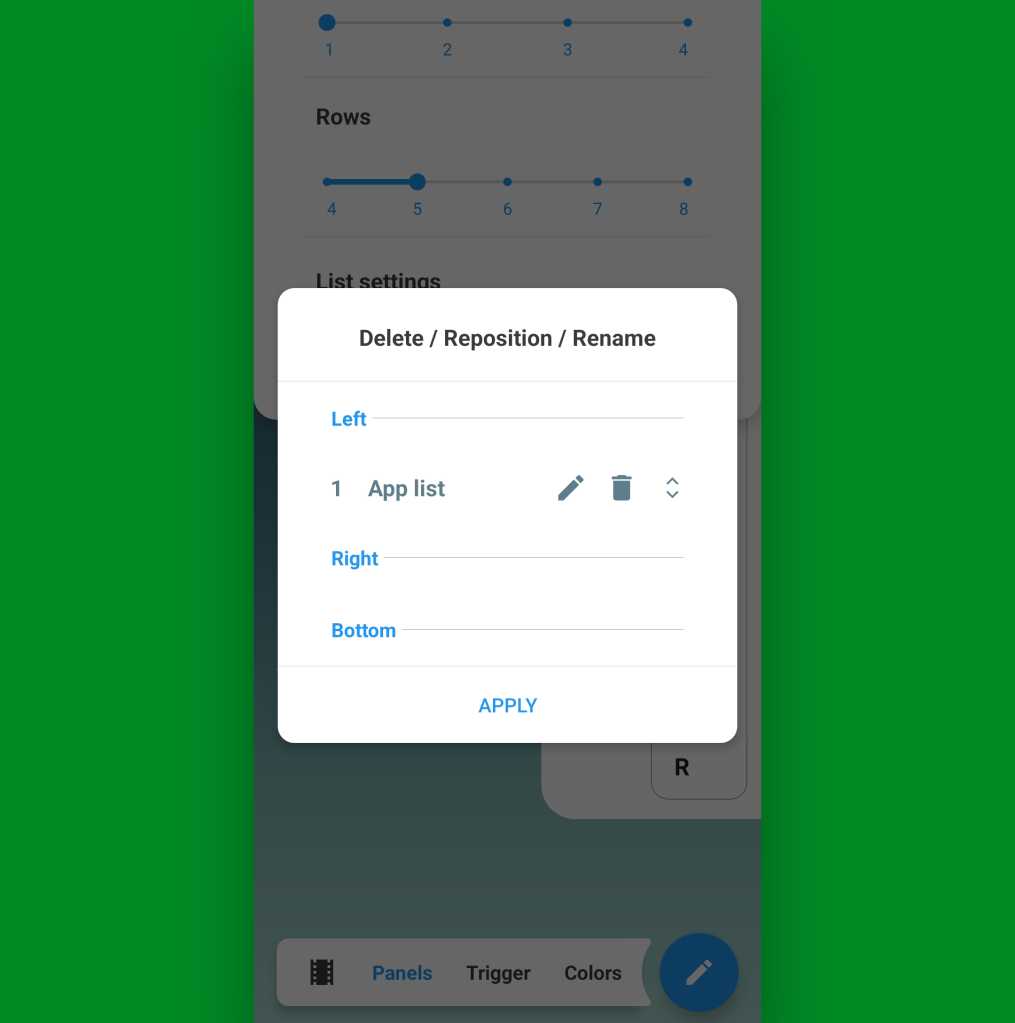
The all-important “App list” option within the Panels Android app. JR Raphael, IDG
At this point, all that’s left is to think about if you want to have your on-demand app drawer available via a swipe on the left or the right side of your screen. I tend to hold my phone in my left hand, personally, so for me, swiping on the leftside of the screen with my thumb is the easiest and most ergonomic gesture. If you hold your phone in your right hand, you might prefer using the right side.
Whichever you choose, make sure the “App list” item is in the appropriate place within that same menu we were just looking at. If you need to move it, press and hold on the right side of its line to drag it into whichever position you want, then tap “Apply.”
And take a deep breath: We’re almost done! At this point, all that’s left are the little details and some opportunities for even more advanced customization.
Some things to consider:
- In the main “Panels” menu on that same settings screen, you may want to extend the length of the “Rows” option to make the list longer and allow it to take up the entire height of your screen without wrapping over to a second line.
- Within that same menu, tapping “List settings” will reveal a series of options for determining if your on-demand app drawer shows recently opened apps, recently installed apps, and recently updated apps along with specific links to different sections of your system settings. You can also manually hide certain apps from the list and prevent ’em from showing up in the list at all, if you have some apps you don’t anticipate ever needing to access.
- If you tap “Trigger” in the main menu selector at the bottom of the screen, you can change the width, height, and precise positioning of the part of your screen where the swipe gesture will be recognized. This may require a bit of experimentation to figure out the optimal placement for you. I like to keep the trigger zone fairly high up on the side of my screen, where (a) I’m unlikely to activate it on accident and (b) it’s easy to reach effortlessly near the spot where my thumb already tends to rest.
- In that same “Trigger” menu, take note of the “Visible width” and “Invisible width” options. By default, Panels will put a thin colored line on the side of your screen to remind you where you can swipe to summon your app drawer. That’s fine if you like it — or if you want to have it there for a little while, until you get used to the idea of using this — but personally, I prefer setting that value to zero and leaving only the “Invisible width” present (meaning there’s no line or visible indication of the panel’s presence on my screen, and I just know where to swipe to find it).
- And note, too, the “Prioritize the back gesture over the trigger” option. If you use Android’s gesture navigation, you’ll almost certainly want to activate that to avoid any conflicts.
- Last but not least, under the “Colors” menu, you can customize the appearance of your panel, if you ever want to play around with that and do something different than the default.
And that, my fellow Android-adoring animal, is about it! Panels doesn’t require any manner of eyebrow-raising permissions, nor does the app collect any kind of personal data. It’s free to use with an optional in-app upgrade to remove some limitations, unlock extra options, and eliminate ads within the configuration interface (and note, if you’re a member of my Intelligence Insider club, you actually have a free lifetime upgrade to the full premium version of Panels as part of your Insider Perk Pack).
I hope you enjoy your new on-demand app drawer as much as I’m enjoying mine — and I hope its presence gives you a renewed appreciation for the choice, flexibility, and genuine practical benefits Android’s approach allows us, just as it has for me.
Get six full days of advanced Android knowledge withmy free Android Shortcut Supercourse. You’ll learn tons of time-saving tricks for your phone!
Android, Google, Mobile Apps, Productivity Software -
Apple sidles into sideloading in the EU
While Apple didn’t rush to embrace sideloading, developers can get ready for it in the EU, as support for this is now live in the latest iOS 17.5 beta.
This is the first big improvement Apple has made to its originally stated plans to bring its business in line with Europe’s Digital Markets Act (DMA). Web Distribution lets authorized developers distribute their iOS apps to users in the European Union (EU) directly from a website owned by the developer.
Apple announced its initial approach to DMA compliance in March, spoke in Europe about its plans a little later, and received lots of feedback, which it is now acting on. Europe has also begun looking into its compliance with the DMA, suggesting Apple’s tweaks reflect the company’s ongoing dialog with EU regulators.
The basic idea is that developers can choose to offer their own apps to customers through their websites, though they must agree to various checks and must also handle customer support, tech support, taxation and more. In some cases, a fee may be payable. But users will want to know how the change will impact them.
What is the user experience?
Customers have become accustomed to the App Store, so it seems likely most people will want to keep using it. However, as developers peel away from the App Store, it’s possible some important apps will become solely available via independent portals, including developer websites. We must wait and see the extent to which this will complicate the user experience and dilute platform integrity.
But, when it comes to web distribution, we can at least see how the system works by considering the customer journey Apple has described. That journey is far from being the miserable experience some of the company’s big-mouthed critics have said it is; it has been designed to inform and protect customers, as I see it.
According to Apple, when a customer chooses to download an iOS app from a developer’s website:
- The first time they choose to download an app from a new developer they must navigate a series of prompt screens in which the significance of the decision is explained.
- They then authenticate with Face ID to agree to give the developer permission to install apps on their device.
- They go through a three-step process to install the app itself.
- And those who want to download other apps from that developer’s website will go directly to the last three steps, as permission will already have been provided.
Apple’s app notarization process actually benefits all parties in this. It does so by requiring the developer to provide clear information and screenshots to explain what the app does and how it works. That means customers should know what they are installing, while notarization means they can be reasonably secure the app has at least received some security vetting — albeit not to the same extent as the App Store.
Who can distribute apps on the web?
To distribute apps via their websites, developers must live in or be registered in the EU, or have a subsidiary incorporated there. They must also have been a member of the Apple Developer Program for two continuous years or more and have an app that had more than a million first annual installs on iOS in the EU in the preceding 12 months.
If they qualify, developers must agree to Apple’s new business terms. Among other things, this includes taking responsibility for customer support and refunds and agreeing to the Alternative Terms Addendum for Apps in the EU.
What about the small print?
With all that in place, developers must:
- Only offer apps from their developer account.
- Respond in timely fashion to questions from Apple concerning distributed apps, particularly around fraud, malware, or anything that could impact the safety and security of users or the platforms.
- Agree to submit their apps to Apple’s notarization process, which aims to protect the company’s platform and its customers.
- Publish transparent data collection policies and offer users control over how their data is collected and used.
- Follow applicable laws, such as GDPR, taxation, and government enquiries.
What support does Apple provide?
Once a qualified developer has set up for business this way, Apple will supply the following resources to enable web distribution of apps:
- Access to a series of APIs Apple has built to enable web distribution, integrate with system functionality, and back-up and restore apps.
- Developers can only sell their apps via App Store Connect registered sites.
- They must also agree to pay Apple a Core Technology Fee of €0.50 for each first annual install of an app once installations exceed one million in 12 months. (Most developers don’t move apps at that scale.)
- A free exemption to non-profits, educational institutions, or government entities based in the EU that have been approved for a fee waiver.
Once set up, developers can download signed binary assets that they can then host for sale and distribution through their own website.
What else has changed?
Changes to Apple’s original proposals include:
- Web distribution of iOS apps.
- A loosening of the rules so larger corporate developers don’t need to handle quite as much bureaucracy.
- The ability of developers who want to build their own app marketplace to qualify without providing a stand-by letter of credit.
- Allowing developers to switch back to Apple’s traditional App Store business model one time. This is designed to protect developers against unexpected business changes, such as in the event a developer’s app sees downloads increase faster than expected.
What else is new?
Apple has promised a range of additional changes to bring its App Store business into strong compliance with the DMA. Among other things, the company will make it possible to delete Safari in favor of other browsers and will provide solutions to make it easier to migrate to other smartphone platforms.
Please follow me on Mastodon, or join me in the AppleHolic’s bar & grill and Apple Discussions groups on MeWe.
Apple, Apple App Store, iOS -
How Workona can transform your team collaboration
Let’s get real for a minute: Much as the companies that create productivity apps would like to think otherwise, most of us don’t work and live entirely within any single software ecosystem.
Sure, maybe you use Google Workspace for your email, word processing, and file storing. Or maybe you consider Microsoft 365 (formerly known as Office) to be your home base.
If you’re anything like me, though, neither of those environments is where your virtual office ends. Perhaps that’s because you use Slack for your professional communication. Perhaps you rely on tools like Trello, Notion, or ClickUp — or, heck, even some combination of ’em! — for more advanced info organizing and project management.
Whatever the case may be, by the time you sprinkle in a pinch of WordPress, a dash of Todoist, and a healthy dusting of Miro, you’ve got yourself quite the cross-platform collaboration cocktail.
And here’s what’s really wild: For as often as many of us work that way, our virtual environments almost seem designed to make it difficult. That’s true even as an individual, as anyone who’s ever juggled two dozen browser tabs across seven different services can tell you. And once you add a team into the equation, it becomes an even greater exercise in frustration to keep track of all the different pieces connected to a typical project puzzle.
A service called Workona might have found the answer. Workona, founded in 2017, has slowly been chipping away at the gap between how we actuallywork these days and the types of work our desktops are designed to handle. With its latest improvements in tow, the service has created a deceptively simple solution for a complex-seeming and maddeningly common problem.
The core Workona concept
It’s easy to think of Workona as a mere tab manager for your browser. In fact, it is also that — via a free extension you can install into Chrome, Edge, or Firefox. (The company says a Safari extension is planned.)
But while that tab manager nomenclature may be the fastest way for an average user to wrap their head around Workona’s offering, it’s really just the very outer layer of what the service represents.
At its core, Workona is all about organizing workspaces within your browser, based on either project or purpose. It’s designed for people who spend their time working across a range of different and typically disconnected-from-each-other web apps. And while it could be useful for just about anyone, it has some supremely effective tools for team-centric collaboration in particular.
In fact, that’s how its founders describe their inspiration for creating the service in the first place. After working together as early employees of Lucid Software (the since-acquired company behind the web-based publishing program formerly known as Lucidpress), Quinn Morgan and Alma Madsen realized that the browser was a pretty lousy framework for the purposes it had evolved to handle.
Plain and simple, pulling up a bunch of disparate services and web pages every time you start working on a project just isn’t efficient. Toggling among all those elements as you’re working wastes time. And trying to keep your co-workers on the same wavelength with all those perpetually shifting pieces is a disaster waiting to happen.
So instead of trying to force you into using only a single productivity platform — an answer that just isn’t practical for most businesses at this point — Workona tames the chaos by acting as a connective tissue that ties all your productivity puzzle pieces together.
Notably, that approach won’t make sense if you’re in an organization that leans heavily on traditional local programs instead of their web-based equivalents. Workona works entirely within your web browser, so if, for instance, you prefer or are required to use the locally installed versions of Microsoft’s productivity apps and all of your work is contained within that one platform, it probably wouldn’t be the right fit for you. But as long as you’re willing and able to open projects on the web at least some of the time, it could go a long way in making those projects more cohesive.
And a more cohesive-feeling, efficient work process is ultimately what Workona is all about.
Filling in the missing spaces
Workona’s chaos-taming philosophy revolves around the concept of spaces. At their simplest level, spaces are centralized work canvases for every project you’re working on, and they exist right within your browser by way of the Workona extensions on the desktop front or the companion iOS app for iPhones and iPads and the mobile website (no dedicated app yet — grumble, grumble…) for Android.
Certain services can also be connected via a direct API-level integration so that they’re accessible in your spaces regardless of whether they’re actively open in a browser tab. This manner of integration is available for Google Drive, Docs, Sheets, and Slides as well as for Slack, Asana, ClickUp, Monday, and Trello. But beyond that, so long as something can be opened in your browser — as most of Microsoft 365 services can, to provide one particularly high-profile example — it can be brought into Workona and associated with your spaces.
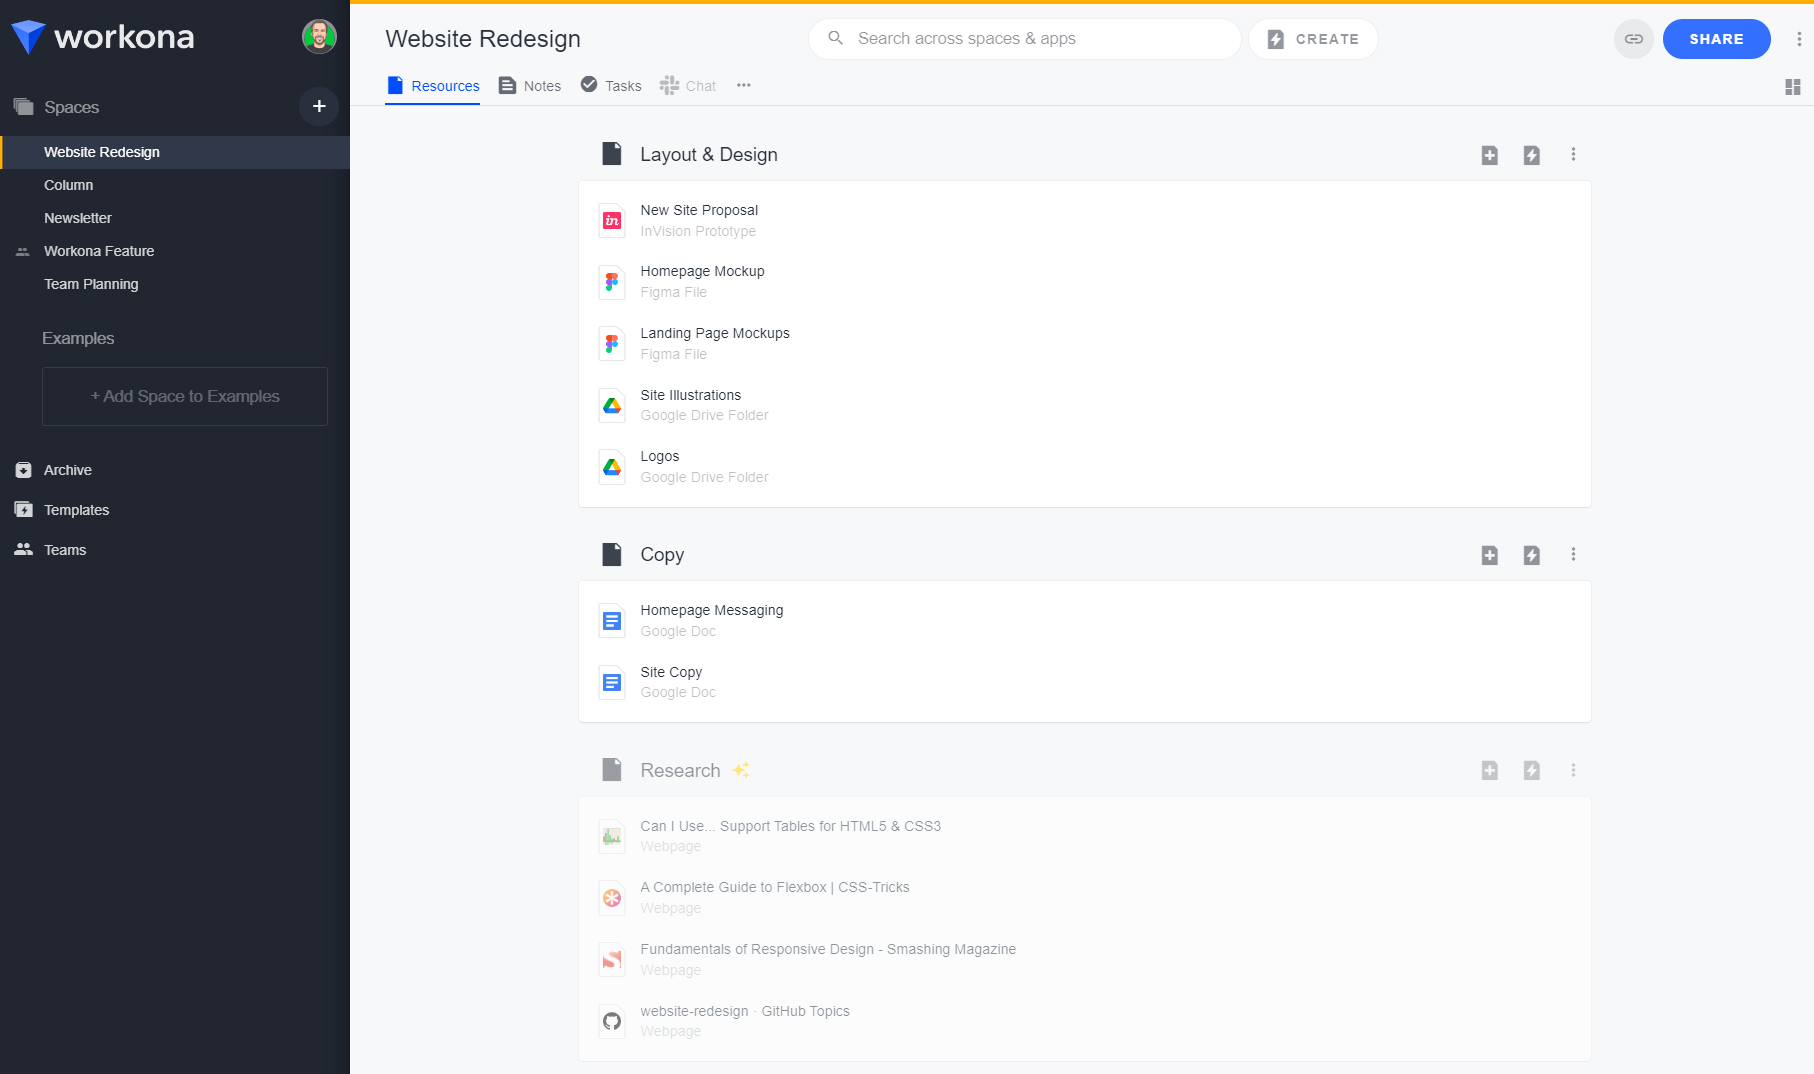
You might, for instance, create a space called “Website Redesign.” Within that space, you could store Google Docs with in-progress copy for different pages, Word files from a client with thoughts and feedback, Drive folders with assorted design assets, Figma files with under-development visual mockups, and collections of live web pages from a private staging site.
That same space could have natively stored notes about goals and timing, lists of specific tasks around different priorities, and even an embedded Slack channel for website-related discussion right within that same area.
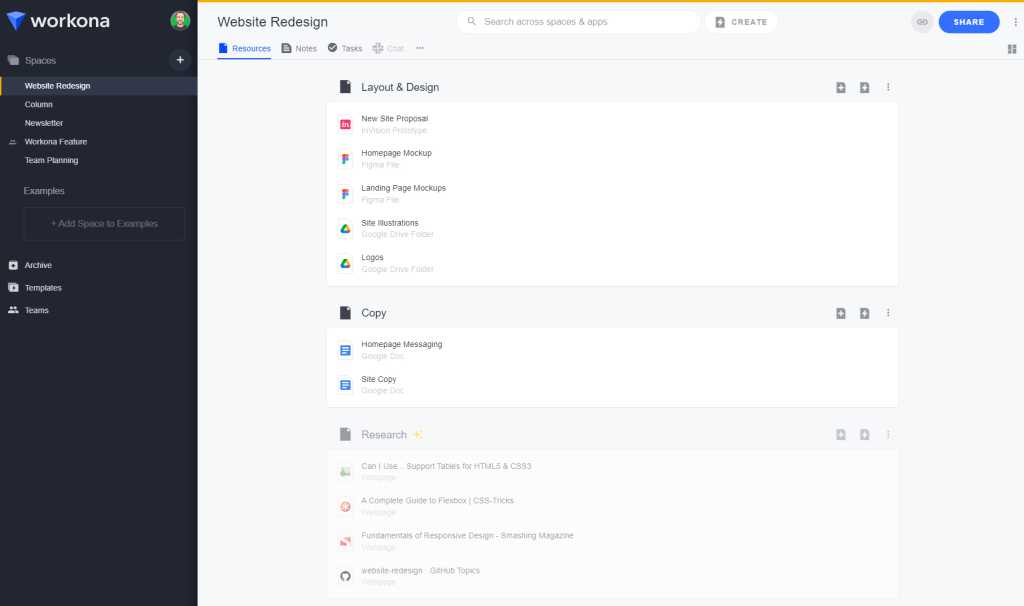
A sample space created in Workona with a shareable mix of documents, files, folders, web pages, notes, tasks, and chat.
A sample space created in Workona with a shareable mix of documents, files, folders, web pages, notes, tasks, and chat.
JR Raphael / IDG
A sample space created in Workona with a shareable mix of documents, files, folders, web pages, notes, tasks, and chat.
JR Raphael / IDG
JR Raphael / IDG
Anyone with access to the space sees the same view, in real time. You can search across all the connected elements right then and there, too, as well as create new elements in any associated app with a couple quick clicks.
Workona even autosaves progress as everyone within a space works, so the canvas is always complete and current and can also be restored to any earlier point as needed. You can open all tabs from a space with a single click, if you’re so inclined, or you can just use a space as a launching pad and selectively fire up individual items as you need ’em.
It’s a lot like the same-named “spaces” feature within the buzzy new browser Arc, only it works on any platform and with anybrowser you want — no awkward (and often impossible, especially in an enterprise setting) switching required. And it’s much more robust in the possibilities it allows, particularly when it comes to collaboration.
To wit: Workona’s latest innovation is its introduction of automatically created unified spaces for teams. That option, rolled out earlier this year, allows teams to create consistent templates that then instantly populate new spaces with specific sets of folders, documents, task lists, and other relevant resources — with the idea being that companies working on projects with clients tend to use the same basic starting points over and over again. And this way, they can create an organized, ready-to-roll workspace involving all their pertinent browser-based tools with a single click and about seven seconds of effort.
Workona is available in a limited free individual plan. For a fully featured experience without any limitations, you’ll be looking at $7 per month for its pro plan, $10 per user per month for its collaboration-ready team plan, or $20 per user per month for its admin-friendly enterprise arrangement.
Hosted on Google Cloud, Workona is SOC 2 compliant and uses 256-bit TLS and AES encryption to protect data in transit and at rest. Read more about Workona’s security practices.
It’s no stretch to say that the web has become the bedrock for much of our modern work. And Workona really does feel like the unifying layer that’s traditionally been missing from that framework. It’s the operating system you never knew you needed, within your browser — and you might just be surprised by how much easier it makes your web of virtual puzzle pieces to manage.
Collaboration Software, Productivity Software -
The webcam privacy guide for Windows PCs
Is someone watching your PC’s webcam? Modern laptops are packed with webcam LEDs, privacy shutters, and even switches that physically disconnect the webcam to ensure you have control. Windows has a variety of useful settings, too — but those software options aren’t perfect.
This is complicated on Windows 11 and Windows 10 PCs because Windows software was designed to have deep access to the operating system. It’s not like on a modern Android phone or iPhone, where the apps have to request access to your camera. No, applications on your system can generally just start using your webcam whenever they like. That’s fine with well-behaved software you trust, but it’s a problem if your computer is infected with remote access Trojans (RATs) or other types of malware.
Modern laptop webcam privacy solutions
Modern laptops — especially business laptops and premium consumer laptops — have built-in webcam privacy solutions:
- Webcam LEDs are common on most laptops with webcams. A physical LED light will appear on or near the webcam when it’s activated. If the LED is on and you’re not using the webcam, that’s a clue something is up.
- Privacy shutters are becoming more common, too. You physically slide a shutter in front of the webcam, and the shutter blocks it from recording.
- Physical webcam shutoff switches are also popping up. You flip a physical switch somewhere on your laptop — perhaps on the side, near the power button or ports — and the laptop disconnects the webcam. It no longer appears as a connected device to Windows, and software on your PC can’t access it until you flip that switch and reconnect it.
If webcam privacy is important to you, be sure you buy a laptop with a shutter that physically blocks the webcam or a switch that disconnects it. Some laptops have function keys that turn off their webcam on the keyboard, but these don’t generally disconnect the webcam — they just send a signal to the operating system to turn it off. Malware running on your PC could reactivate the webcam if you disable it in this way.

Business laptops often have physical privacy shutters — no taping over your webcam necessary.
Chris Hoffman, IDG
How to see which apps have used your PC’s webcam
Windows 10 and 11 both will tell you which applications recently used your PC’s webcam.
[Boost your Windows IQ with my free Windows Intelligence newsletter — three things to know and try every Friday and a free Windows Field Guide to start!]
Unfortunately, this convenience isn’t foolproof. Microsoft’s own documentation points out that some applications might not appear in this list. While this access log is nice to have, sophisticated malware running on your PC could certainly dodge it.
To find the list of apps that recently accessed your webcam:
- On Windows 11, open the Settings app and select “Privacy & security” in the left pane. Scroll down and click “Camera” under App permissions. Scroll down again and click “Recent Activity” to see which applications have used your camera in the last seven days.
- On Windows 10, open the Settings app and select “Privacy.” Choose “Camera” under App permissions in the left pane. Examine the list of apps, especially the desktop apps at the bottom — Windows will show you the date and time each app last accessed your webcam.
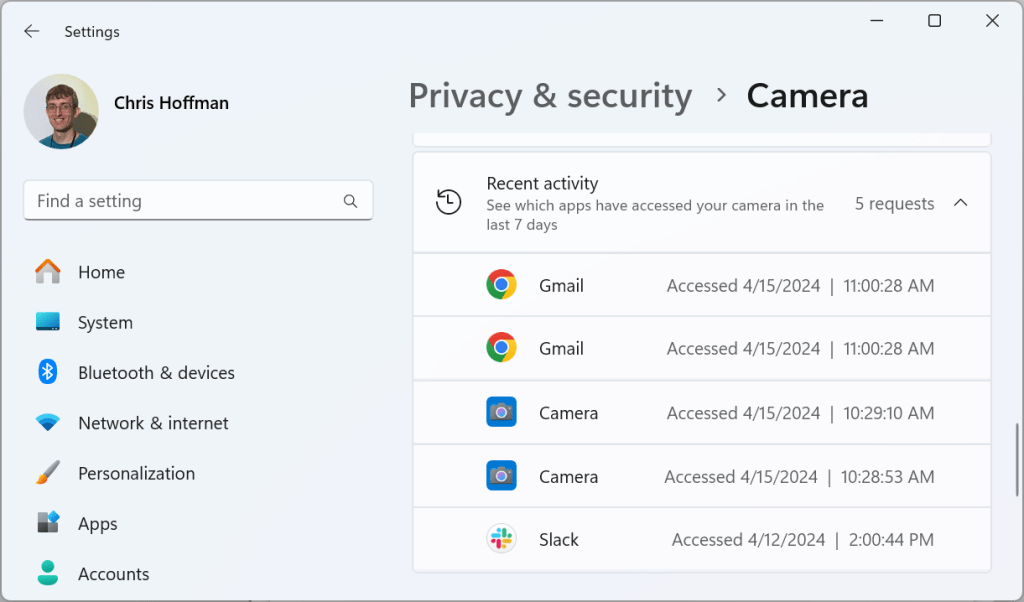
Windows has a lot of options for seeing and controlling webcam access. But they’re not foolproof, and malware can get around them.
Chris Hoffman, IDG
You might see your web browser here, too. Websites can access your webcam, but only if you let them — your web browser controls which sites have access to it. You can check which sites in your browser’s settings:
- In Google Chrome, click menu > Settings. Select “Privacy and security, “ click “Site settings,” and click “Camera.” Look at the “Allowed to use your camera” list here — you can remove sites if you don’t want them to have access to your camera.
- In Microsoft Edge, click menu > Settings. Select “Cookies and site permissions,” and click “Camera” under All Permissions. Look at the list of sites in the “Allow” list — these are the sites that have access to your webcam.
- In Mozilla Firefox, click menu > Settings. Select “Privacy & Security.” Scroll down to the Permissions section and click “Settings” to the right of Camera. You’ll see a list of sites that have been given access to your webcam here.
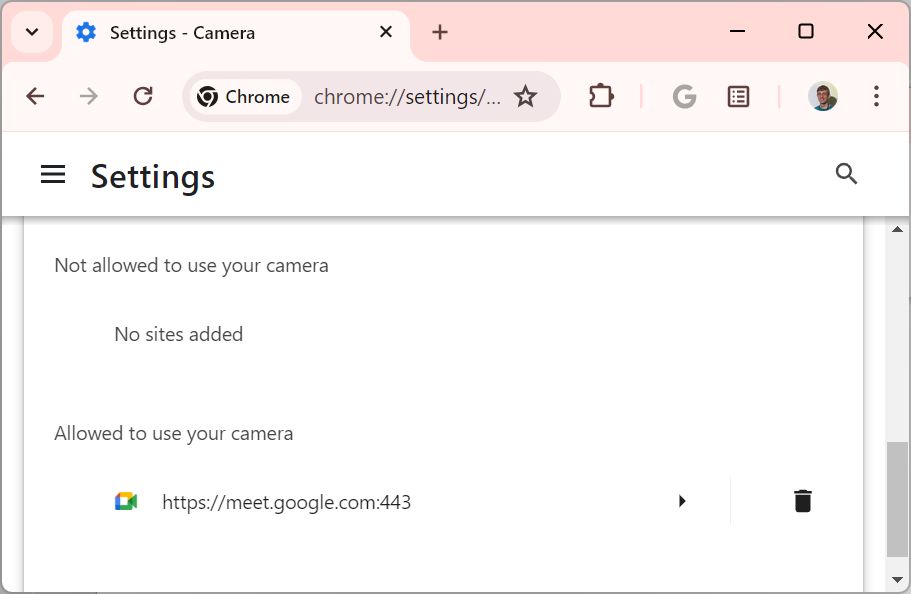
Your web browser gives you complete control over which websites get access to your PC’s camera.
Chris Hoffman, IDG
How to see if your webcam is being used right now
Windows relies on the camera’s status LED to turn on to indicate your camera is being used. For devices without physical camera LEDs, Windows will show on-screen “Camera on” and “Camera off” messages.
You can activate these on-screen messages on any Windows PC with the “NoPhysicalCameraLED” registry hack, if you like.
Other ways to disable your PC’s webcam
While many modern laptops have great solutions for disabling your webcam — all those shutters and switches — some don’t. You still have options:
- Unplug your webcam: If you use an external webcam, you can just unplug its USB cable from your computer when you aren’t using it.
- Turn it off in the UEFI or BIOS: If your laptop has a built-in webcam you’re not using, you could boot into its UEFI firmware settings screen — this is the modern replacement for the traditional BIOS settings screen. You can boot to this interface from the Windows Recovery Menu. From here, you can usually find an option to deactivate the webcam. It won’t function again until someone reboots into this screen and activates it once again — that’s inconvenient if you frequently use the webcam, but it’s a nice privacy upgrade if you never do.
- Tape or cover your webcam: The traditional method of covering your laptop’s webcam with tape or some other kind of cover still works! It became extra famous when Mark Zuckerberg revealed he tapes his webcam back in 2016. Now, most of us aren’t billionaires, and Zuckerberg certainly faces privacy threats most people don’t. But even this low-tech solution works for him. (These days, hopefully Zuckerberg has a modern laptop with a built-in webcam privacy cover or disconnect!)
By the way, you’ll also find options to turn off your webcam at Settings > Privacy & security > Camera on Windows 11 and Settings > Privacy > Camera on Windows 10. You can use these options if you like, but don’t rely on them: As the interface itself says on Windows 11, “Some desktop apps might not appear on this page or be affected by these settings.”
As with the list of apps that have recently accessed your webcam, traditional Windows desktop apps could get around this setting, even if you turned off the microphone — and it’s likely the most dangerous malware applications would be designed to do so. If you’re concerned about privacy, it’s much better to physically cover or disconnect the webcam — or at least disable it at a low level in your system’s UEFI settings.
Wait, what about microphone privacy?
There’s a huge elephant in the room here — and that’s microphones. Laptops have integrated microphones. Those microphones don’t have status LEDs and there are no physical switches to turn them off.
Picture a conference room full of laptops with excellent webcam privacy solutions: Each laptop has the shutter closed. Malware running on any of those laptops could still listen in. Of course, that would require at least one of those laptops to be infected with malware — and malware on a laptop could capture all kinds of other sensitive information, from passwords and payment details to sensitive correspondence.
Still, as PCWorld pointed out in 2019, laptop manufacturers haven’t offered the kind of microphone privacy switches we see in smart speakers. Hopefully that will be a focus going forward.
For now, you could perhaps boot into UEFI firmware settings and disable your laptop’s integrated microphone from there if you’re concerned. Or, you could just tape over your microphone. When Mark Zuckerberg revealed he tapes over his laptop’s webcam, he also revealed he tapes over his laptop’s microphonehole, too. Of course, you can prevent many of these threats with good security practices, too. As long as your computer isn’t infected by malware, you don’t have to worry about someone listening in on you.
Still, it usually pays to be extra careful — especiallyif you’re a billionaire like Mark Zuckerberg.
Want even more practical Windows knowledge? Check out my free Windows Intelligence newsletter to get the best Windows tips in your inbox — and get a free Windows Field Guide just for subscribing.
Desktop PCs, Privacy, Windows, Windows 10, Windows 11